안녕하세요 슬짱입니다.
오늘은 날씨 API 활용 법에 대해서 작성해 보겠습니다.
1. https://openweathermap.org/ 사이트 접속 - 회원가입
2. My API keys로 이동
-. 생성되어 있는 API key를 볼 수 있습니다.
3. 날씨 API 문서로 이동
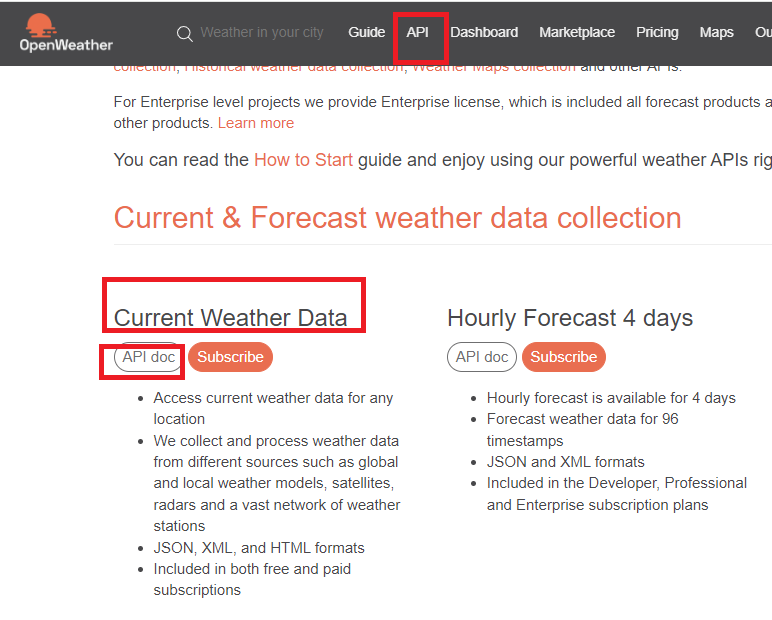
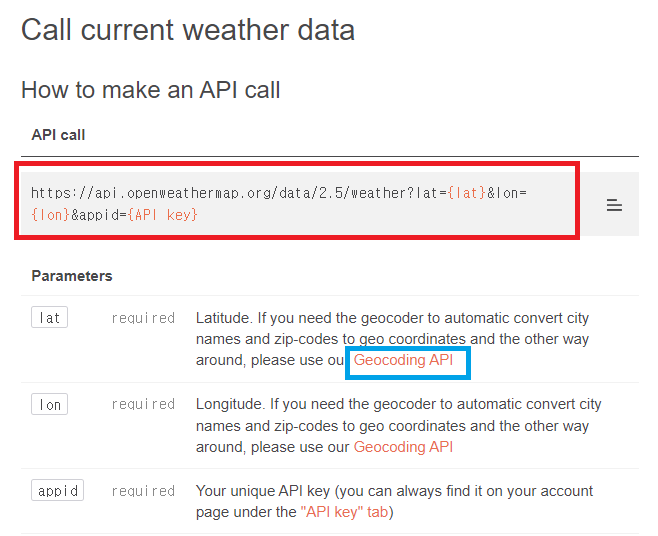
4. API 주소 확인
'https://api.openweathermap.org/data/2.5/weather?lat={lat}&lon={lon}&appid={API key}'
API 주소는 이미 확인했고 lat과 lon의 경도/위도 데이터를 알아야 합니다.
Geocoding API 에 들어갑니다.
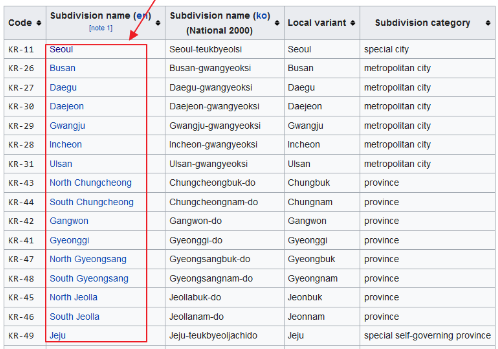
5. 위도/경도 데이터를 불러 올수 있는 또다른 API 주소가 나옵니다.

ISO 컨트리 코드를 참고하여 API 주소를 생성합니다.
출력 화면
Seoul
37.5666791
126.9782914
경도와 위도 값을 확인하였습니다.
6. 다시 날씨 API 페이지로 접근 합니다.
https://api.openweathermap.org/data/2.5/weather?lat={lat}&lon={lon}&appid={API key}
lat과 lon 변수에 데이터를 넣어주고
API 주소를 작성합니다.
이때 lang은 kr를 사용합니다.
출력 화면 >
{'coord': {'lon': 126.9778, 'lat': 37.5683}, 'weather': [{'id': 800, 'main': 'Clear', 'description': '맑음', 'icon': '01d'}], 'base': 'stations', 'main': {'temp': 23.96, 'feels_like': 23.53, 'temp_min': 20.69, 'temp_max': 24.66, 'pressure': 1014, 'humidity': 43}, 'visibility': 10000, 'wind': {'speed': 4.63, 'deg': 260}, 'clouds': {'all': 0}, 'dt': 1715577651, 'sys': {'type': 1, 'id': 8105, 'country': 'KR', 'sunrise': 1715545476, 'sunset': 1715596344}, 'timezone': 32400, 'id': 1835848, 'name': 'Seoul', 'cod': 200}
챗 gpt에 보기 좋게 정렬하라고 했습니다.
* json은 튜플 형식임
{
"coord": {
"lon": 127.0467,
"lat": 37.2889
},
"weather": [
{
"id": 800,
"main": "Clear",
"description": "맑음",
"icon": "01d"
}
],
"base": "stations",
"main": {
"temp": 23.98,
"feels_like": 23.14,
"temp_min": 23.16,
"temp_max": 24.4,
"pressure": 1013,
"humidity": 27
},
"visibility": 10000,
"wind": {
"speed": 1.54,
"deg": 40
},
"clouds": {
"all": 0
},
"dt": 1715577707,
"sys": {
"type": 1,
"id": 5509,
"country": "KR",
"sunrise": 1715545497,
"sunset": 1715596290
},
"timezone": 32400,
"id": 6573030,
"name": "Namhyang-dong",
"cod": 200
}
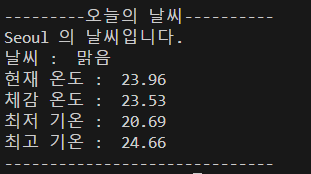
7 . 여기서 필요한 필드만 가져 옵니다.
출력화면 >
'6.QA > [API] 테스트' 카테고리의 다른 글
| 웹 에러코드 참고하기 (0) | 2024.04.21 |
|---|---|
| [Docker] 설치 및 방법 및 API 테스트 (1) | 2024.01.25 |